


💡 Heads up! You can find the code for every article in this series on GitHub, with a tag per article: github.com/trumbitta/giant-robots/tags
At this point of the series, you should have a working frontend app with a working backend app and a couple libs.
While it is entirely possible to build the backend app for production and deploy it somewhere, we are now going to see how to have one backend app for local development and one backend app destined to run as a Netlify function, with a shared data service.
Let's get into it!
Creating the Netlify site and deploying the function
Ok, open a terminal in your giant-robots workspace and run:
npm install @netlify/functions
Then create a new @nrwl/node app:
# You shouldn't need to install @nrwl/node because Nx
# installed it for you when you installed and used @nrwl/nest

nx generate @nrwl/node:application --name=backend-netlify
Now open apps/backend-netlify/src/main.ts, delete everything, and paste this in:
import { Handler } from "@netlify/functions";

const handler: Handler = async (event, context) => {
  return {
    statusCode: 200,
    body: JSON.stringify({ message: "Hello World" }),
  };
};

export { handler };
From now on you'll need a Netlify account (but it's easy, and free for our needs), and you'll need to create a "site" and import your giant-robots repository from GitHub. If you don't want to create your own repo (but you should!) you can fork mine and work from there.
So be sure to push all of your code so far, if you didn't already!
Once your Netlify site is created, its "Build settings" should look like this:
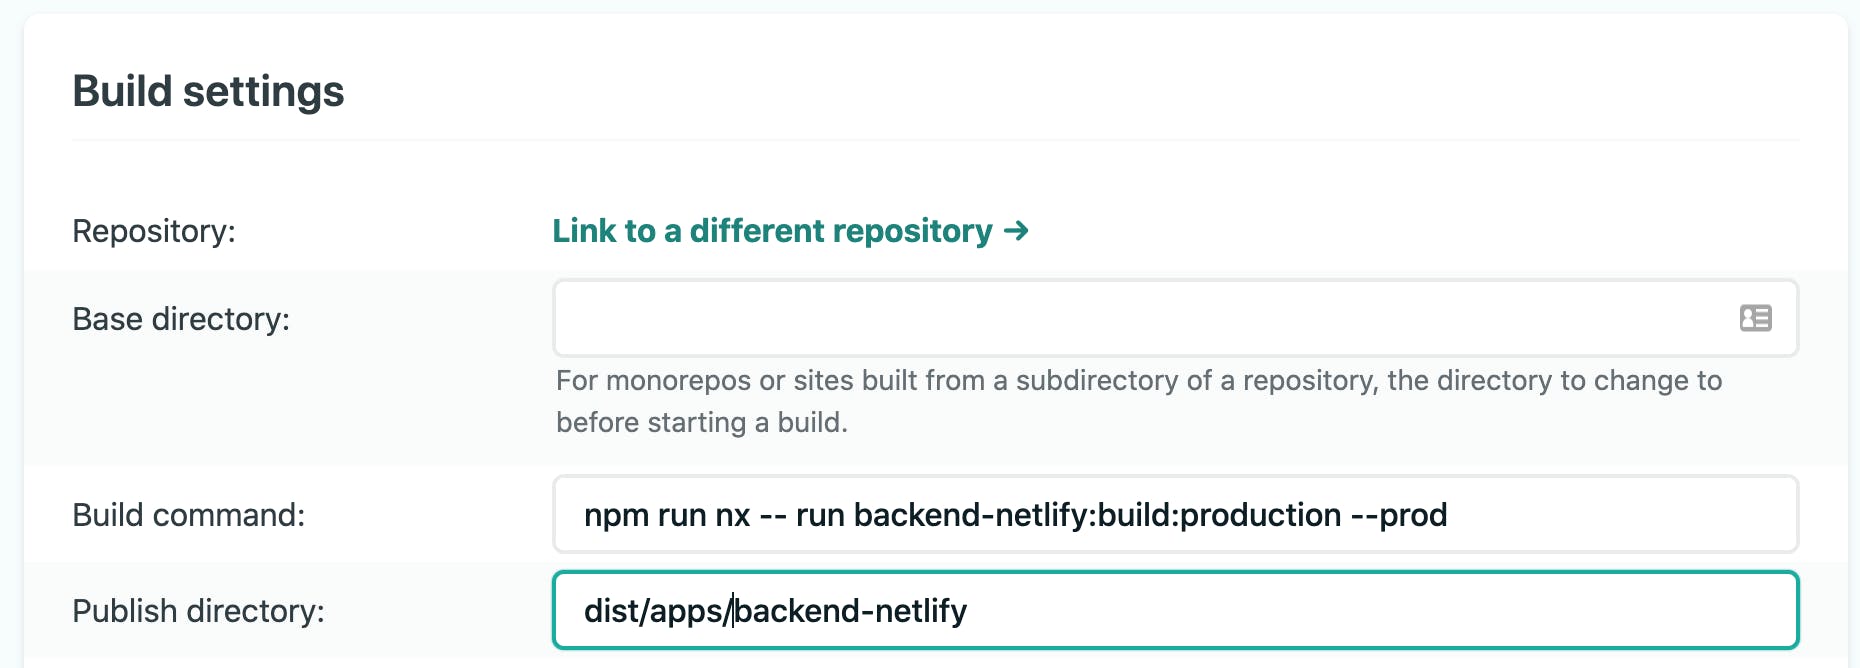
# Build command
npm run nx -- run backend-netlify:build:production --prod
# Publish directory
dist/apps/backend-netlify
While its "Functions directory", which you can find under "Advanced build settings", should be set to:
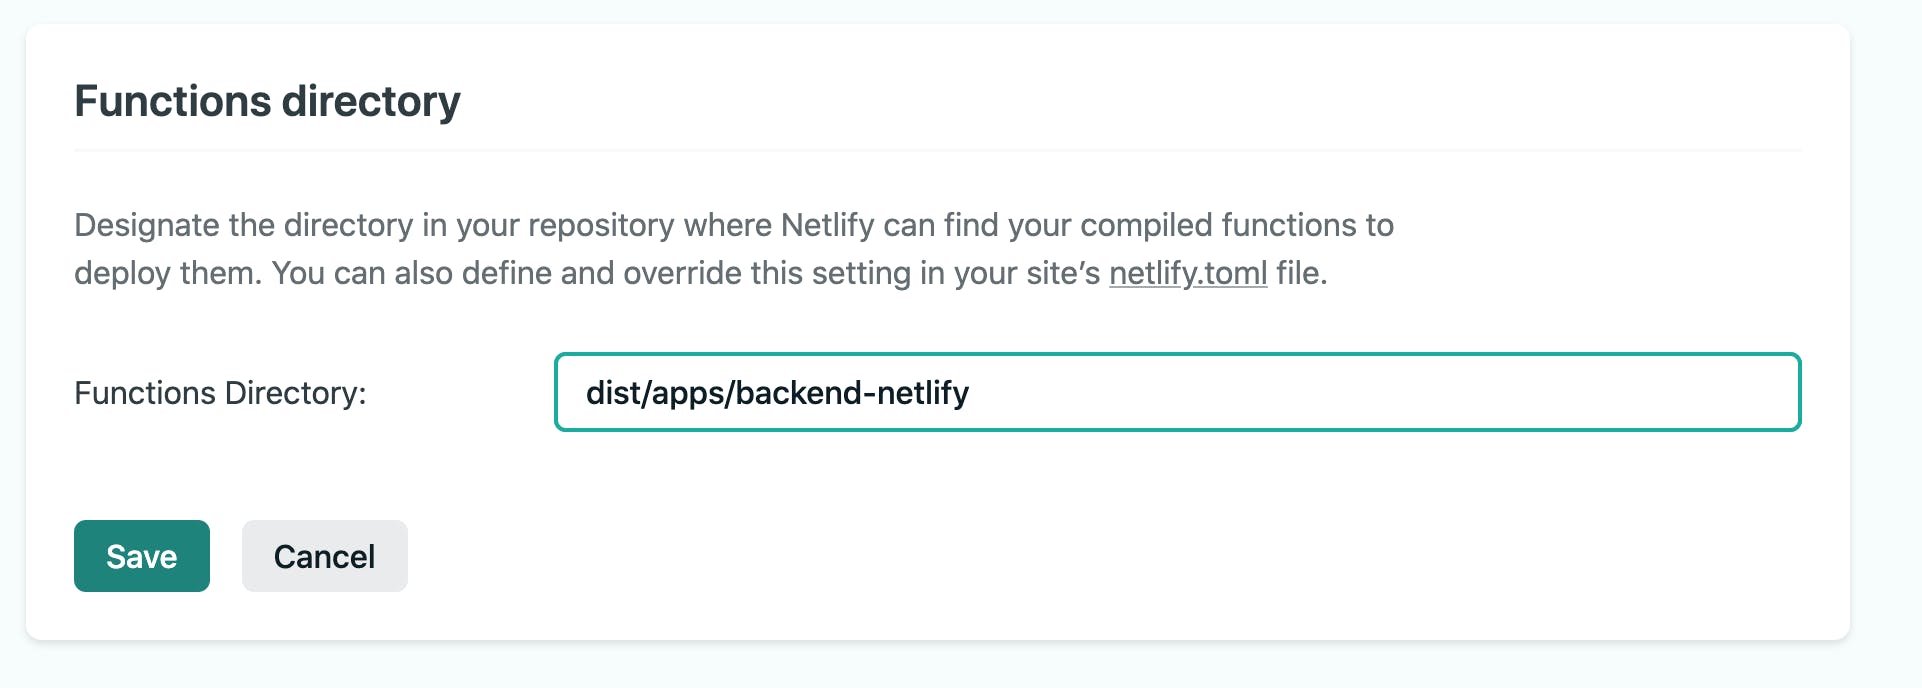
# Functions directory
dist/apps/backend-netlify
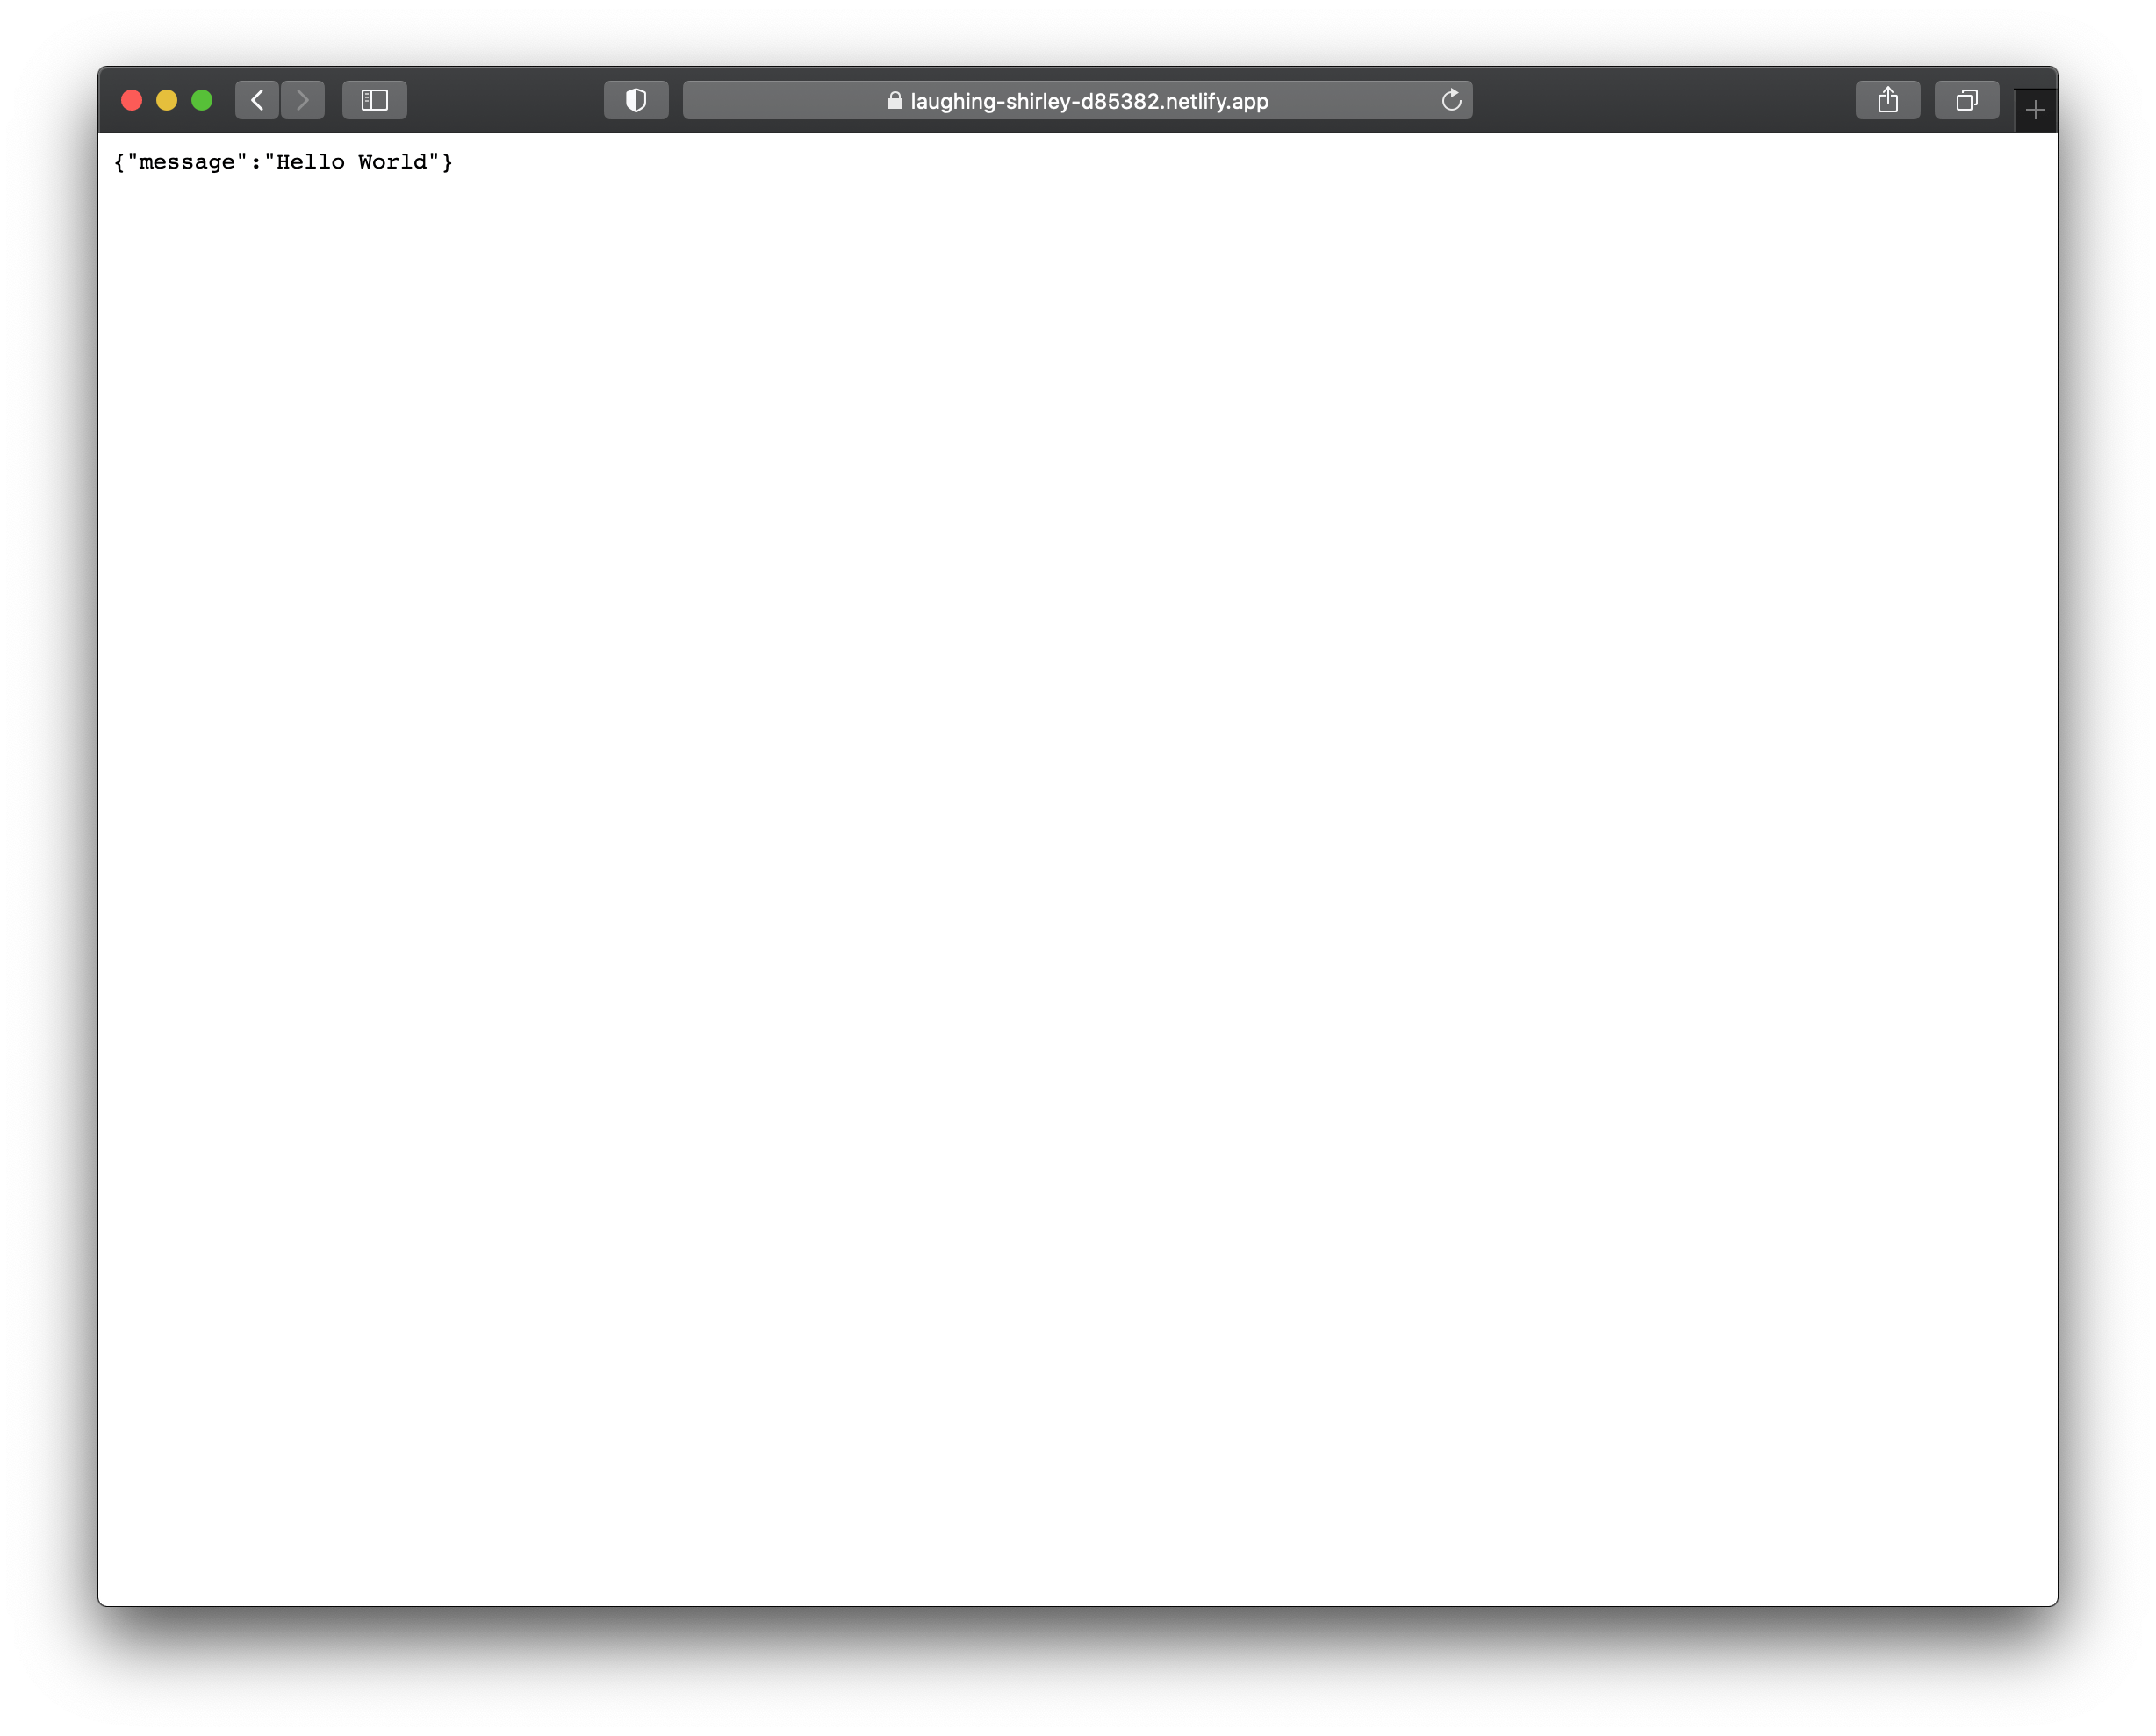
Upon creation, Netlify should immediately start to build and deploy your new site. It will also give you a unique URL you will use to access the site.
Here is mine as I'm writing this:
https://laughing-shirley-d85382.netlify.app/.netlify/functions/main
It won't work for you though, because I'm shutting it down as soon as I'm done with the writing: I don't want for Netlify –and my account– to get any unexpected traffic.
The important part is /.netlify/functions/main. Add it to the URL of your own site and you'll see this:
Sharing data between backend and backend-netlify
The gist of it is "use a lib". Here's the simplest way of doing it:
nx generate @nrwl/workspace:library --name=backend --directory=shared --strict
Go to libs/shared/backend/src/lib and delete the autogenerated files:
cd libs/shared/backend/src/lib
rm *
Create a new get-robots.function.ts file instead:
// libs/shared/backend/src/lib/get-robots.function.ts

// Libs
import { GiantRobot } from '@giant-robots/shared/models';

export const getRobots = () =>
  [
    {
      name: 'Mazinger Z',
      height: 18,
      weight: 20,
    },
    {
      name: 'God Sigma',
      height: 66,
      weight: 1200,
    },
    {
      name: 'GoLion',
      height: 60,
      weight: 700,
    },
    {
      name: 'Tengen Toppa Gurren Lagann',
      height: 9.4607305e22,
      weight: Infinity,
    },
    {
      name: 'Albegas',
      height: 40,
      weight: 1200,
    },
  ] as GiantRobot[];
And update libs/shared/backend/src/index.ts to export the new function / data service:
export * from './lib/get-robots.function';
Now also update apps/backend/src/app/app.service.ts to make backend use the new service:
import { Injectable } from '@nestjs/common';

// Libs
import { GiantRobot } from '@giant-robots/shared/models';
import { getRobots } from '@giant-robots/shared/backend';

@Injectable()
export class AppService {
  getData(): GiantRobot[] {
    return getRobots();
  }
}
And do the same thing in apps/backend-netlify/src/main.ts for backend-netlify:
// Third Parties
import { Handler } from '@netlify/functions';

// Libs
import { getRobots } from '@giant-robots/shared/backend';

const handler: Handler = async (event, context) => {
  return {
    headers: {
      'Access-Control-Allow-Origin': '*',
      'Access-Control-Allow-Headers': 'Content-Type',
      'Access-Control-Allow-Methods': 'GET, OPTION',
    },
    statusCode: 200,
    body: JSON.stringify(getRobots()),
  };
};

export { handler };
☢️ Notice we are also adding a very lousy CORS configuration just to make this work. Please never actually configure your CORS headers like this! ☢️
🙅🏻 Enable CORS is a better place to get inspiration from, but beware I'm no infosec expert and I'm taking no responsibility for any misconfiguration in your own servers and applications 🙅🏻
Ok so, now your dep graph should look like this:
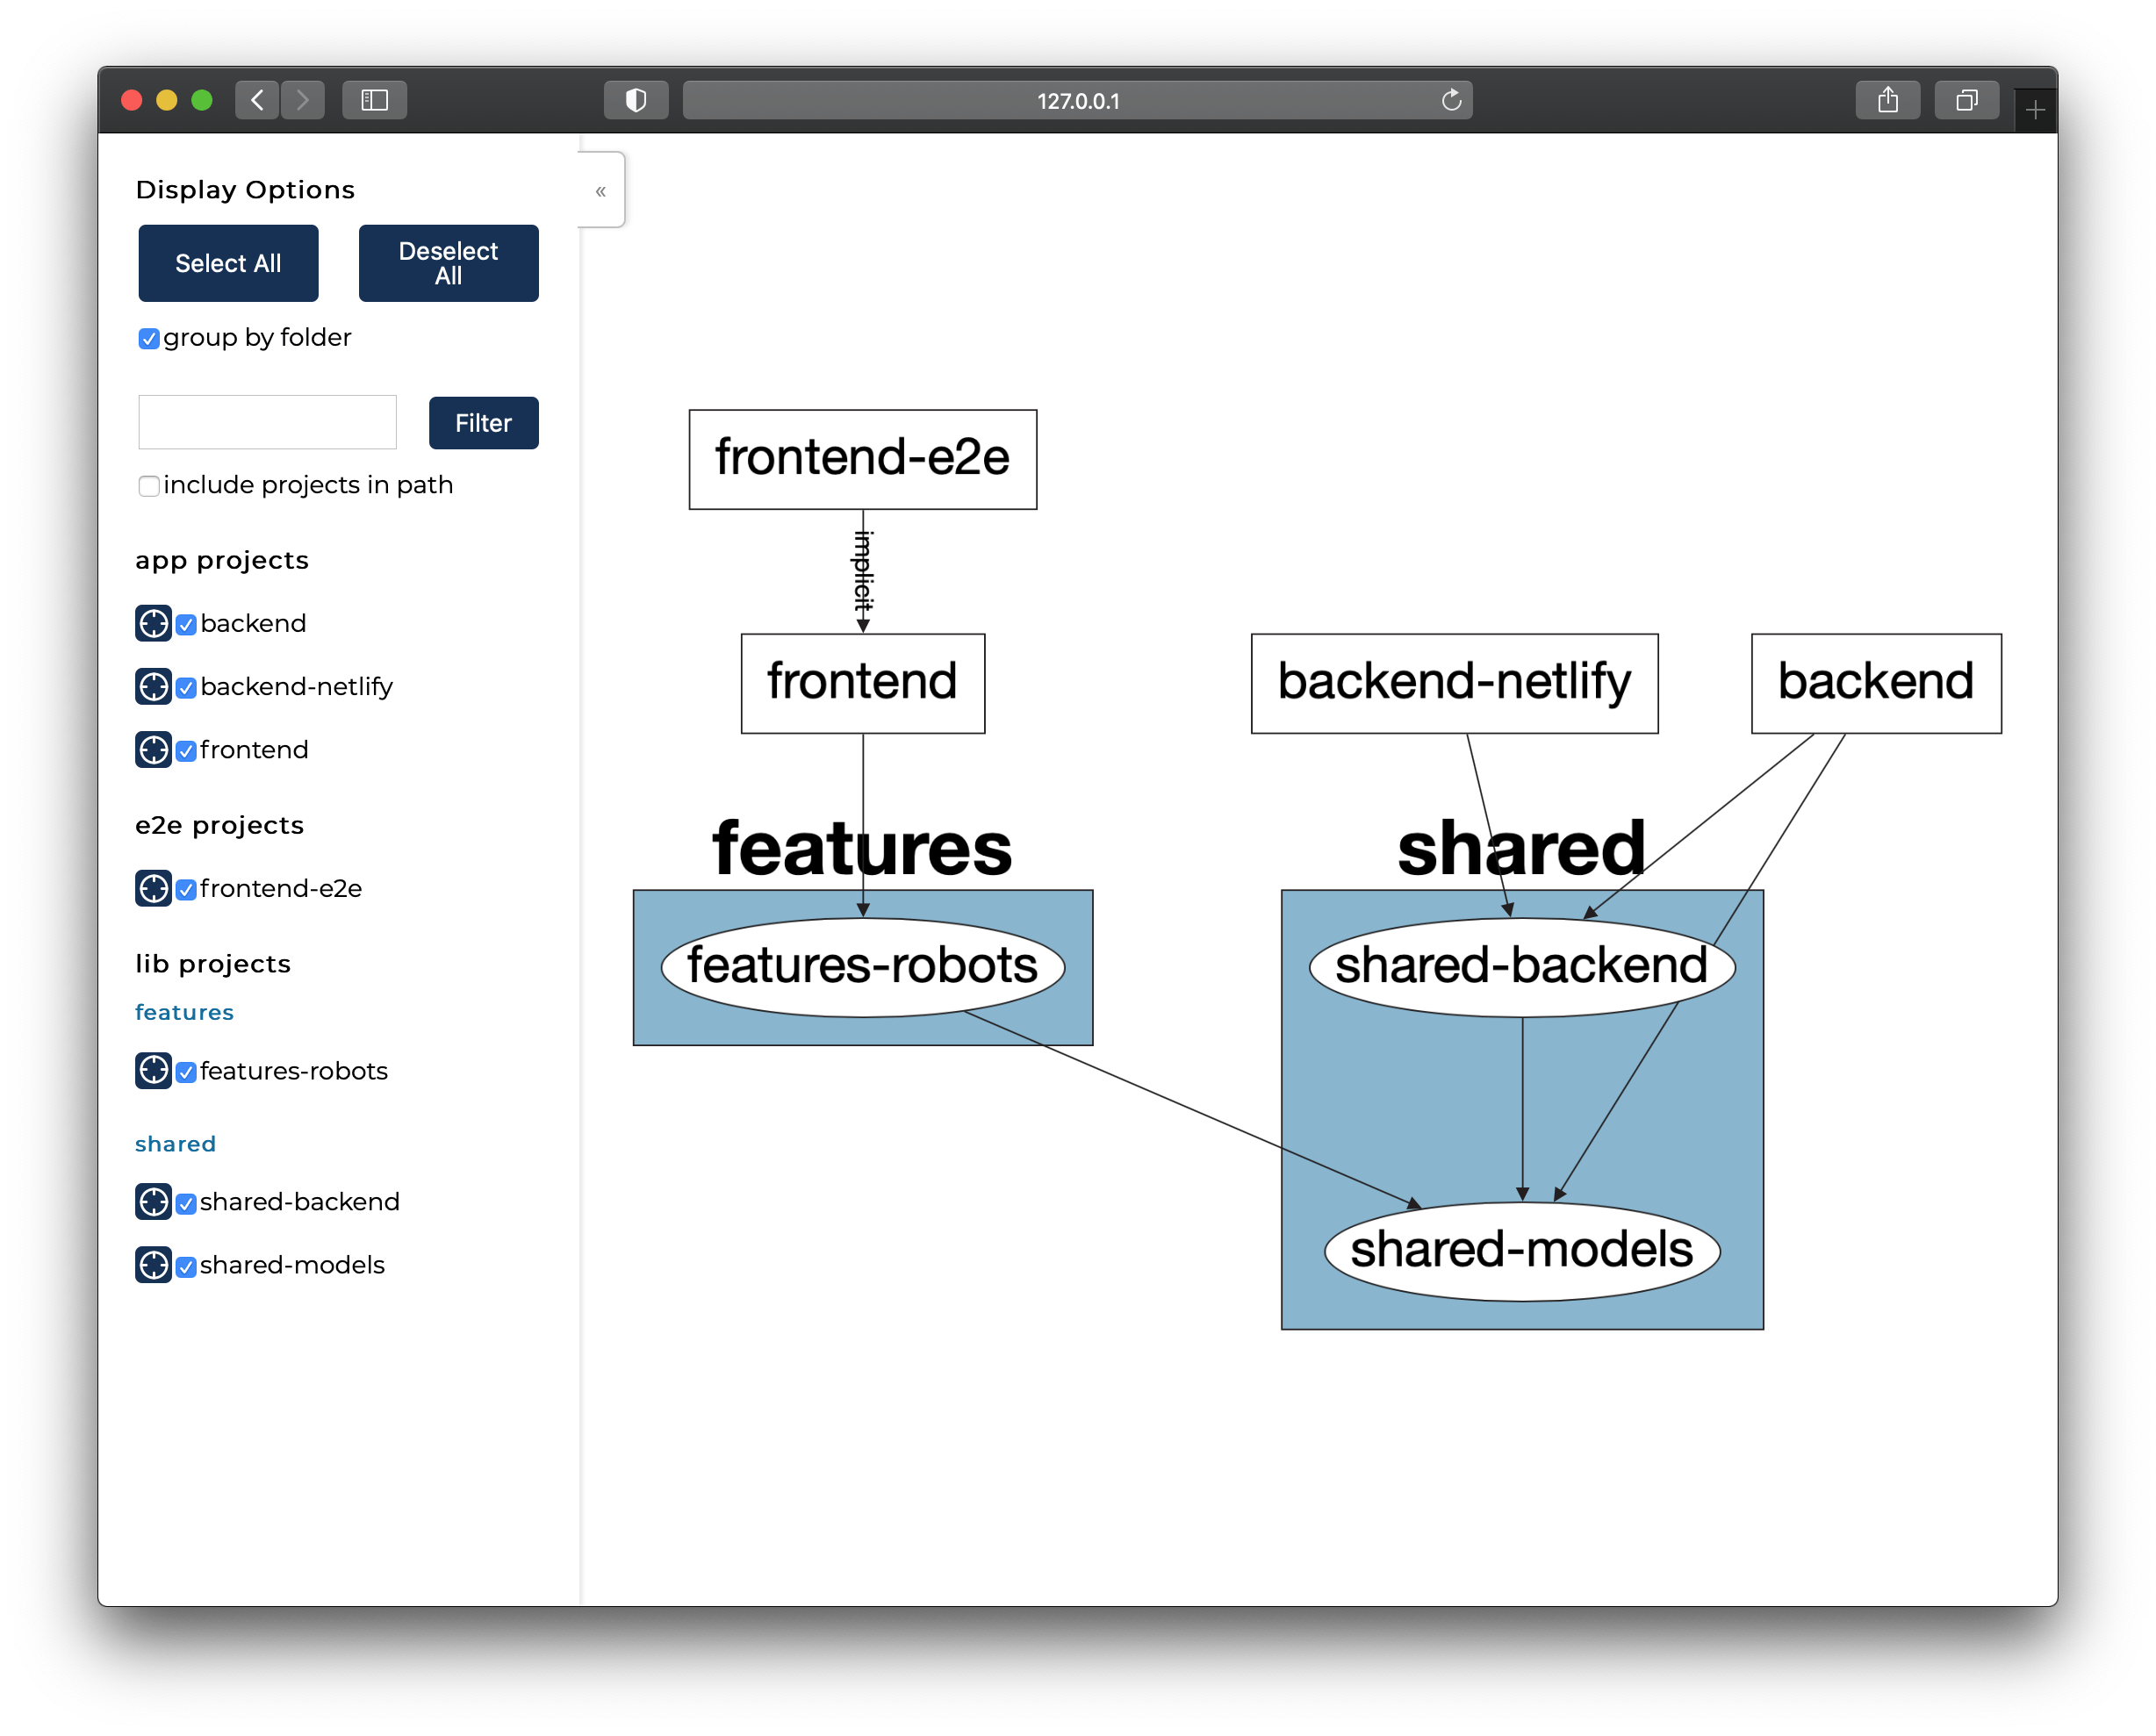
# remember?
nx dep-graph
Deploying the frontend to Netlify
Create a new Netlify site, importing your giant-robots repo again for this new site.
Settings are similar to the ones you used for backend-netlify:
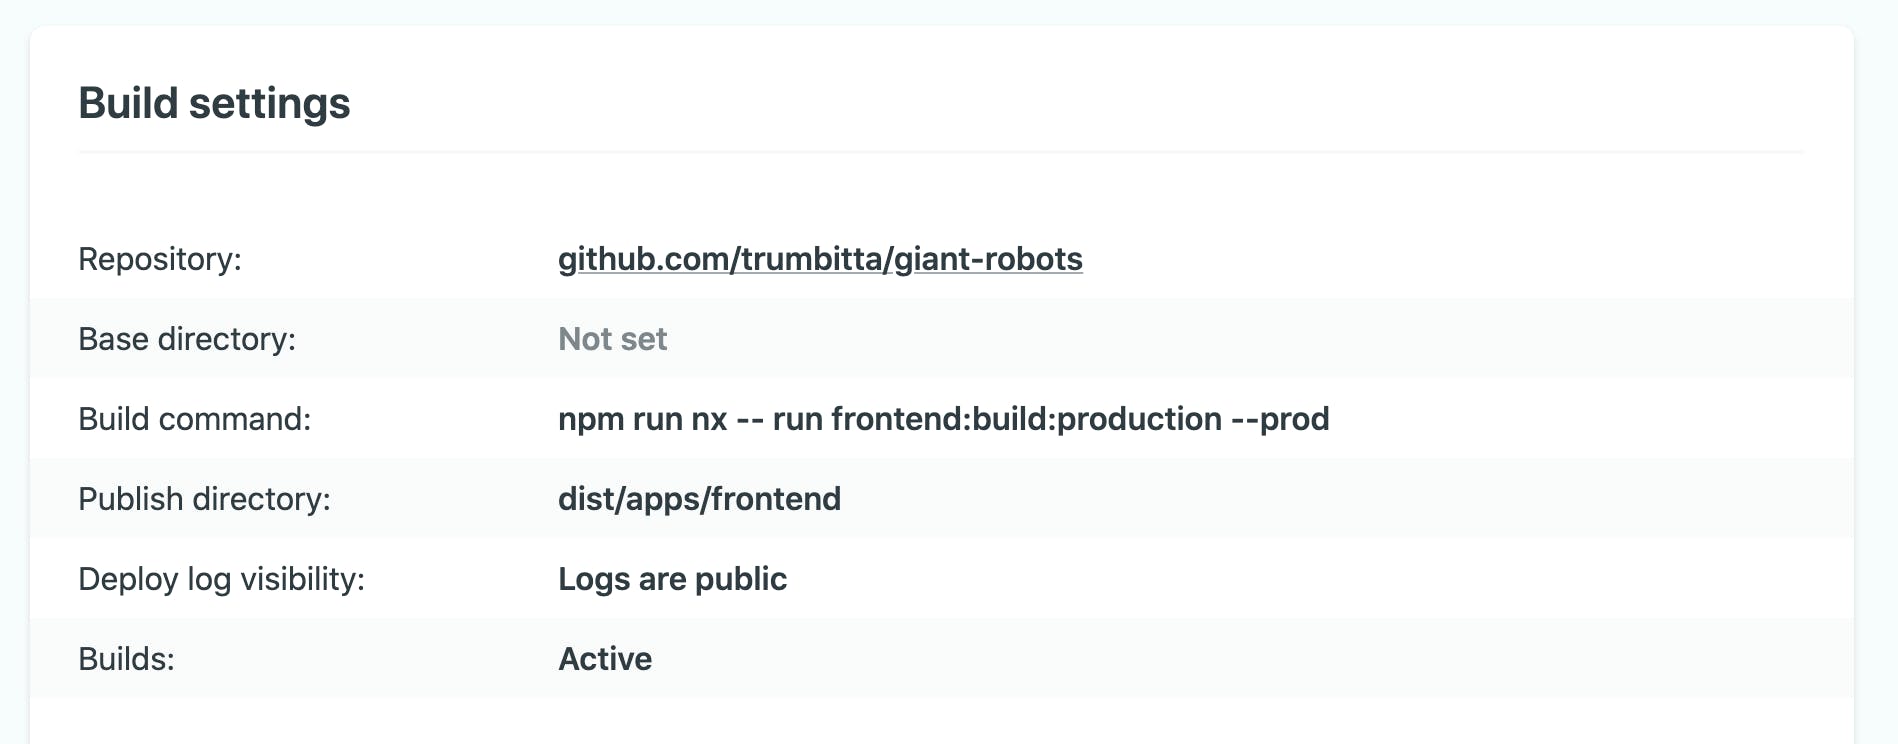
While you wait for it to be built and deployed, it's a good time to acknowledge that this is not a very good way to deploy two apps from the same monorepo on Netlify. It's just an exercise to let you stretch your Nx muscles and end up with something that's working and online.
If you are interested in how things are really supposed to work, this post is a great starting point: netlify.com/blog/2020/04/21/deploying-nx-mo..
Ok, the new site should be online by now:
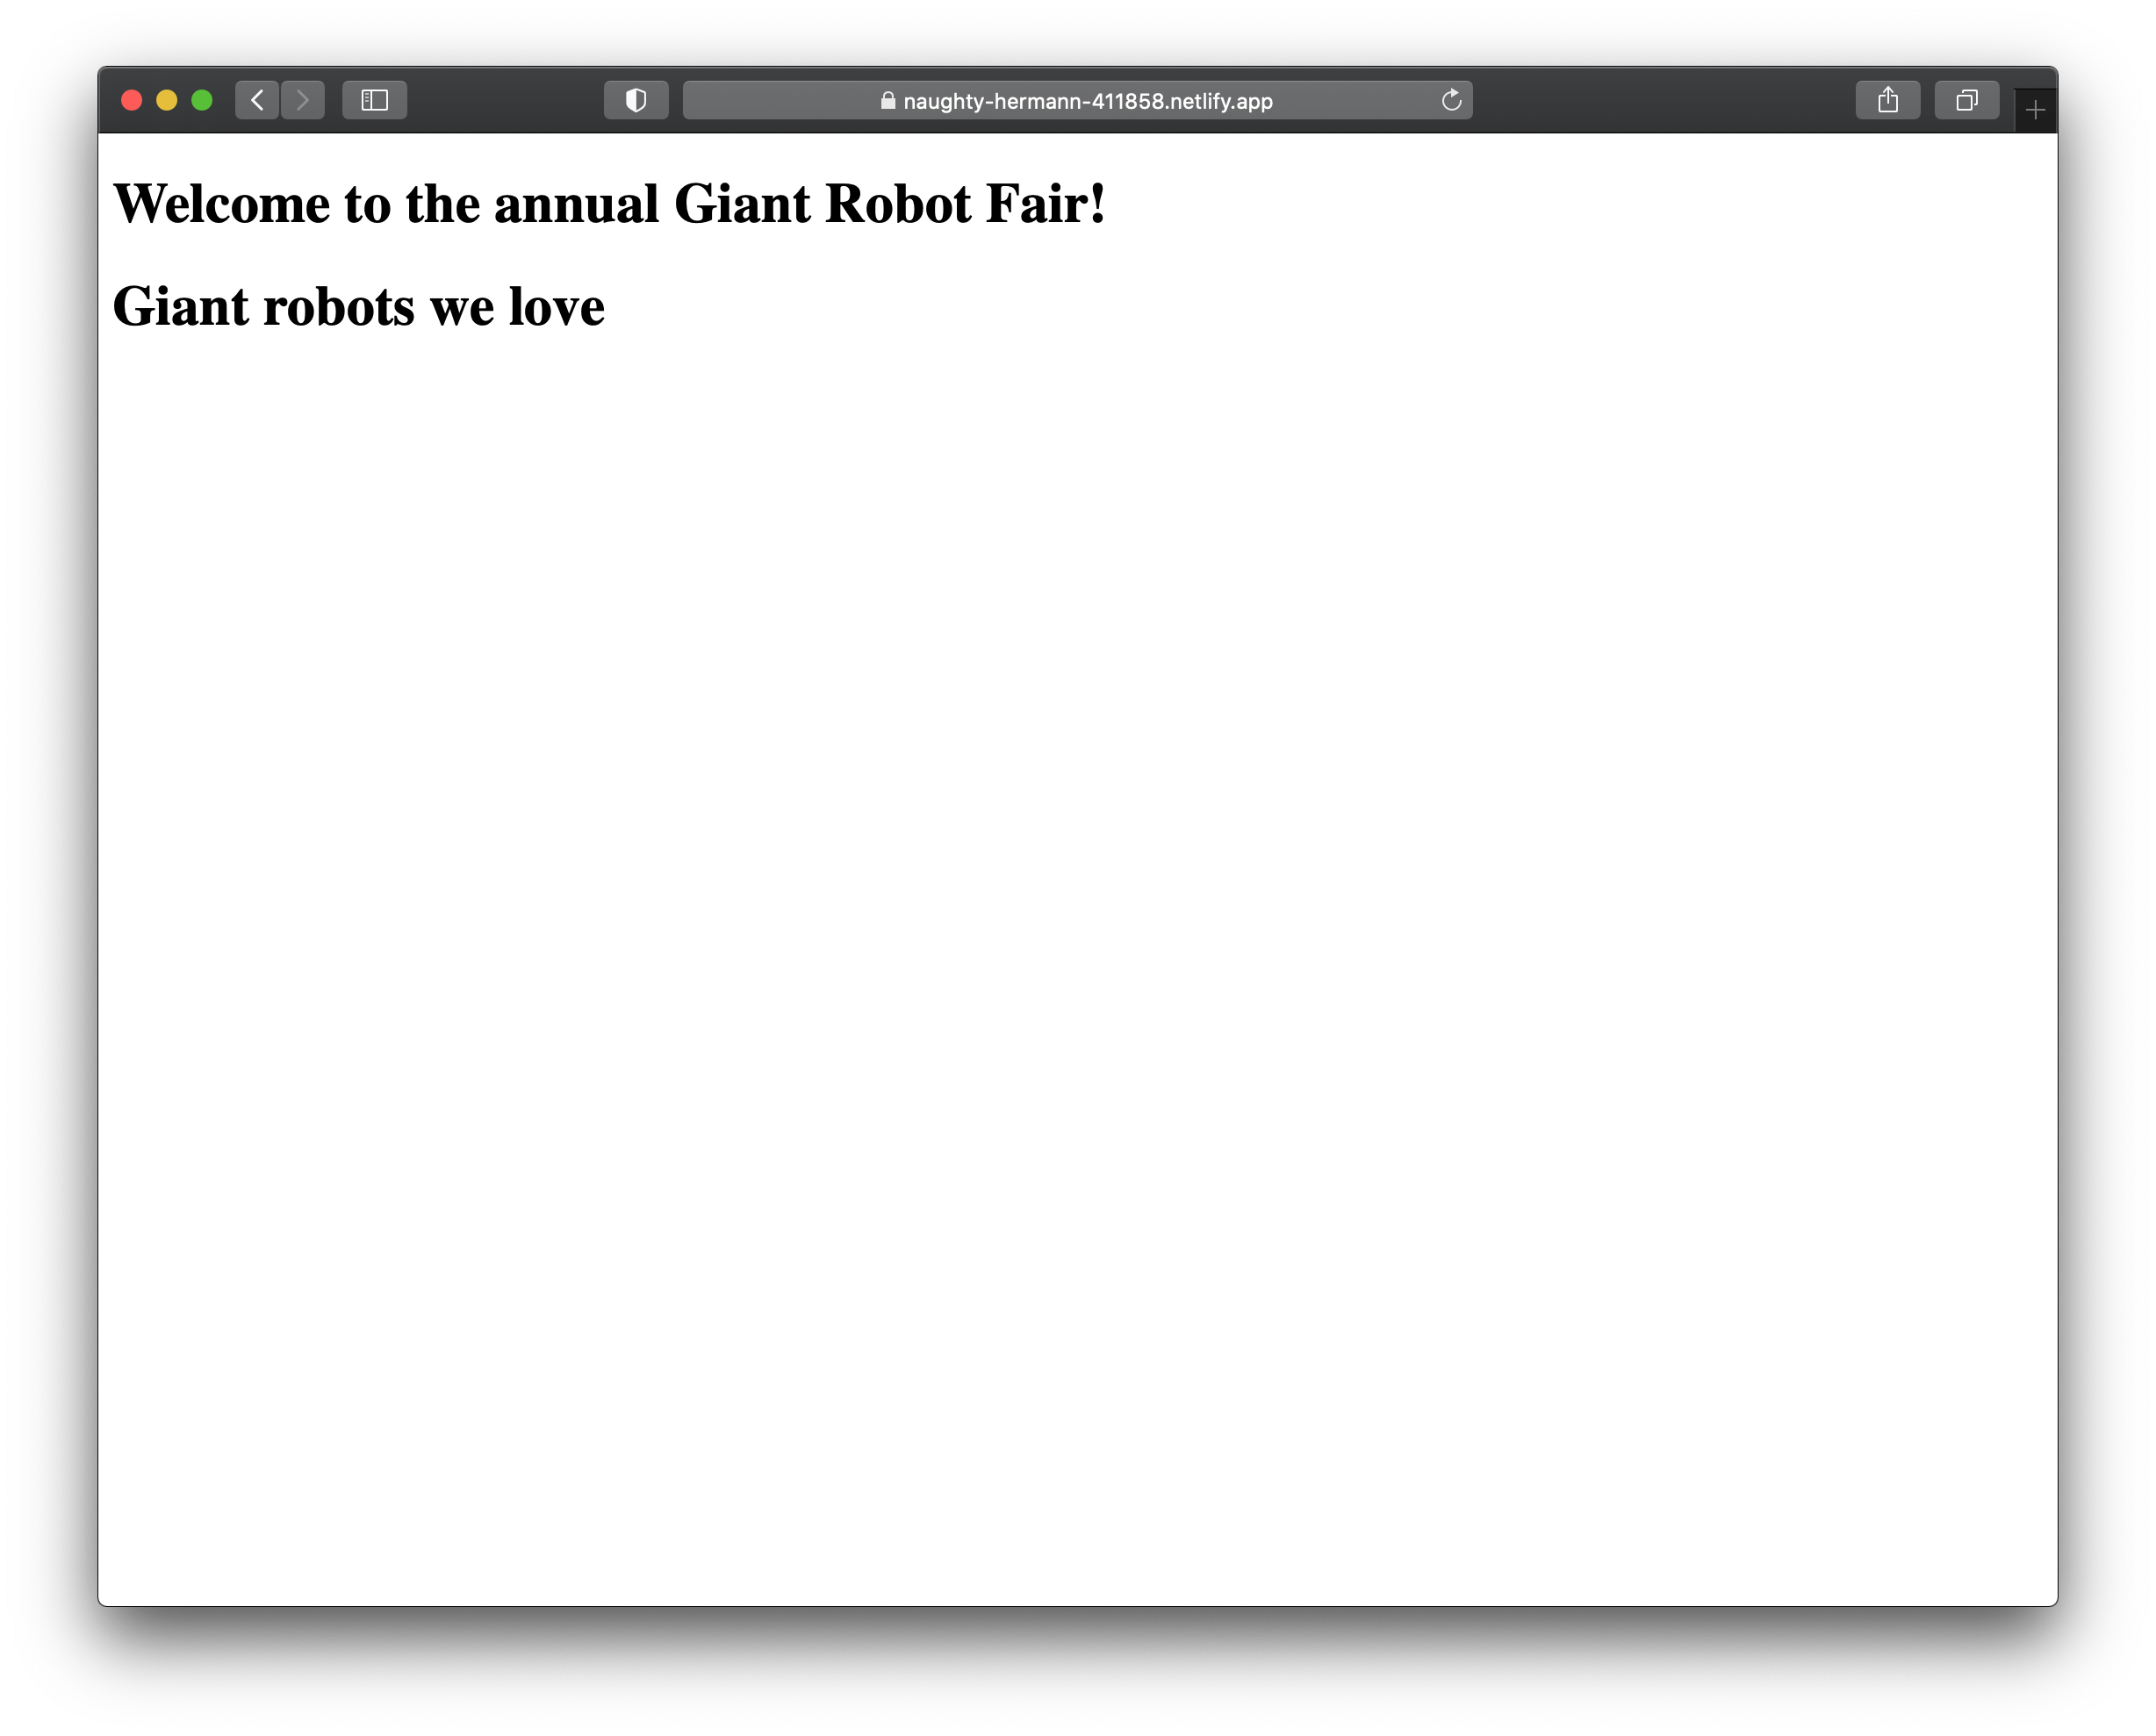
And it's broken. Of course it's broken! Our frontend app still expects to get data from an endpoint served by backend, not backend-netlify!
To each their own
So let's get data from backend in development and from backend-netlify in production, duh!
Rember environments?
Update apps/frontend/src/environments/environment.ts:
export const environment = {
  production: false,
  fairAdjective: 'tentative',
  apiEndPointRobots: '/api',
};
And update apps/frontend/src/environments/environment.prod.ts
// Replace <YOUR_NETLIFY_APP_NAME_HERE> with... your Netlify app name 😬

export const environment = {
  production: true,
  fairAdjective: 'annual',
  apiEndPointRobots:
    'https://<YOUR_NETLIFY_APP_NAME_HERE>.netlify.app/.netlify/functions/main',
};
And also apps/frontend/src/app/app.tsx of course:
[...]
function App() {
  const { apiEndPointRobots, fairAdjective } = environment;
  const [giantRobots, setGiantRobots] = useState([]);

  useEffect(() => {
    fetch(apiEndPointRobots)
      .then((response) => response.json())
      .then(
        (data) => setGiantRobots(data)
        // TODO: Add error handling
      );
  }, [apiEndPointRobots]);
[...]
Start the frontend app and the backend app to check if it all still works in local development:
# Terminal 1
nx serve frontend

# Terminal 2
nx serve backend
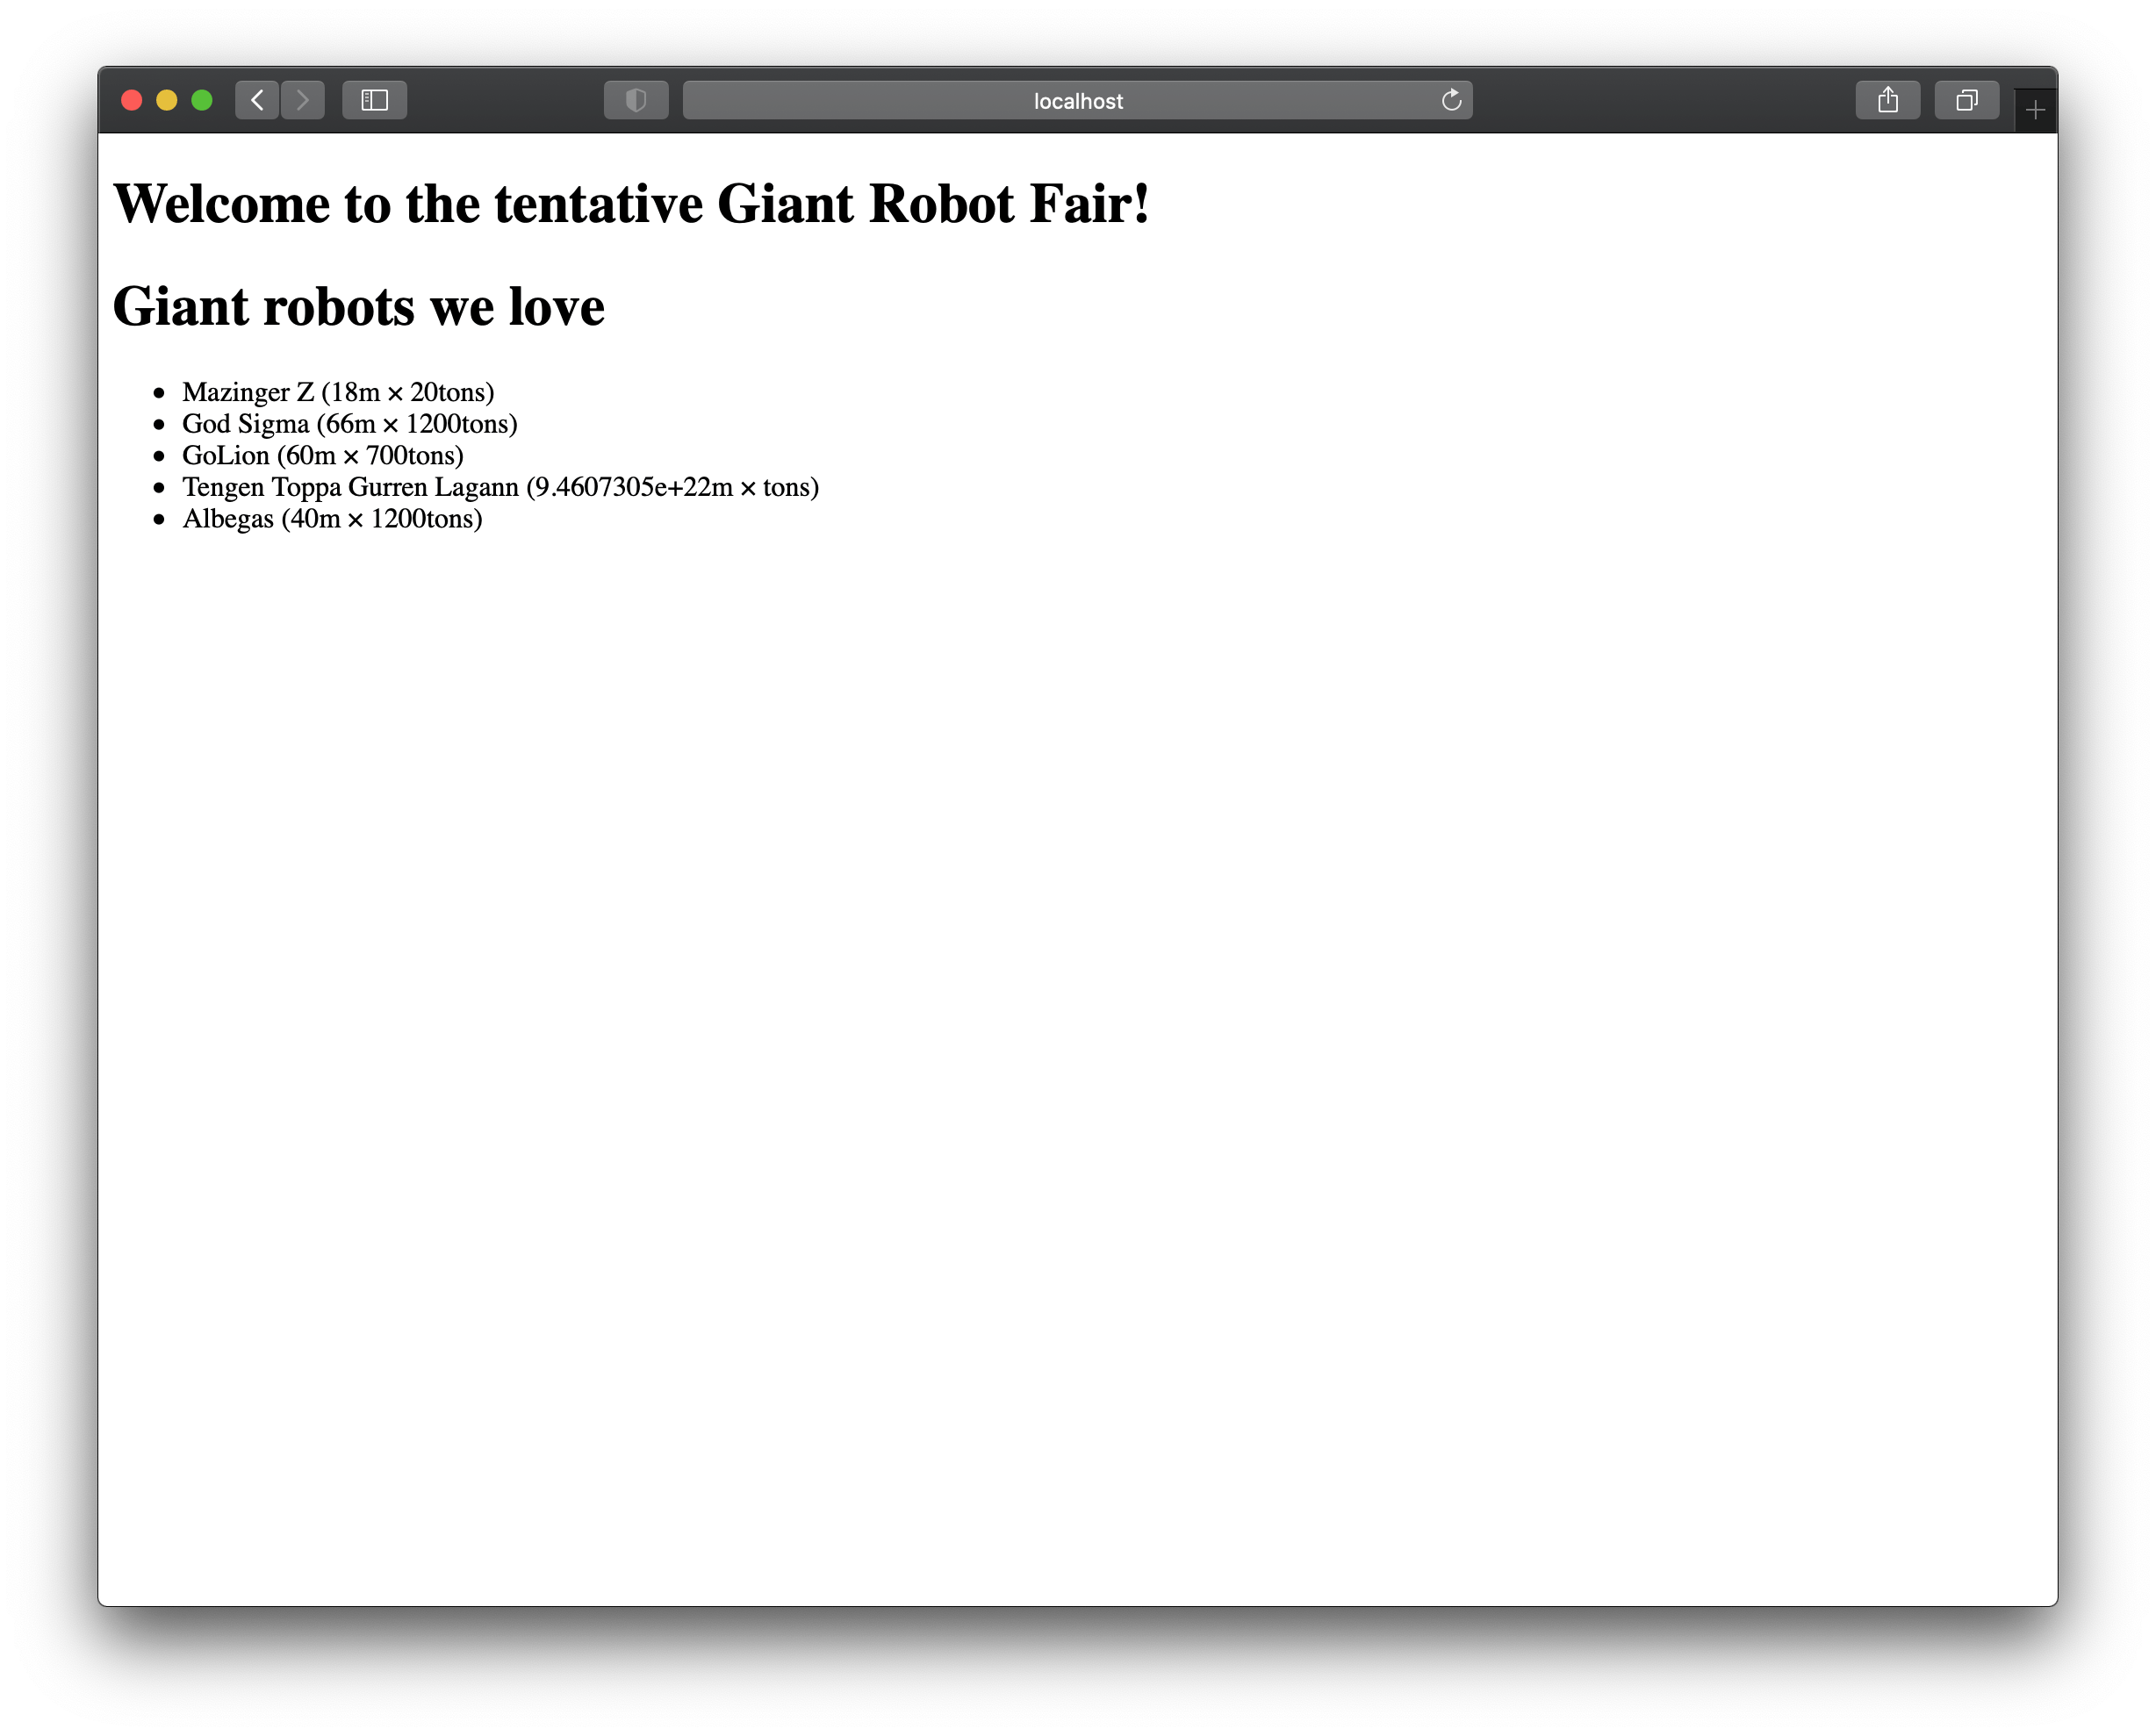
Yup, still works.
Will it work online, too? 🤞
Commit and push everything you have, wait for the two Netlify sites to build, then point the browser to your Netlify frontend URL and:

Woohoo! Serverless, baby! 🍻
Wrapping up
This time you learned how to use what you already knew about Nx to achieve something new: going serverless in production while keeping a familiar backend app in development, and sharing a data service between the two applications.
Next time you'll learn how to leverage my frankly awesome 😎 OpenAPI plugin for Nx to help you get a little more serious about the data access layer of your applications, and possibly ease the collaboration between a frontend team and a backend team.
And if you're liking this series so far, don't forget to let me know on Twitter and spread the word with a retweet or sharing the link!
Cover photo by Mika Baumeister on Unsplash